Valid for the following ranges :
- Essential GGM IPI & GGM NVI
- Standard GGM IPS & GGM NVS
- Advanced GGM IPA & GGM NVA
- Pro GGM IPP & GGM NVP
 Article applies only to certain references *
IIt is always recommended that you first commission your recorder locally, using a monitor directly connected to it. However, it is still possible to do this step from your smartphone via the GGM WATCH app.
For the procedure to work correctly, make sure that you observe the following points:
- Network connection : connect your recorder to your local network (e.g. your Internet router) using an RJ45 cable.
- Smartphone on the same network : your phone must be connected via WiFi to the same local network as the recorder.
- DHCP IP address : The recorder is configured in DHCP by default, so make sure your network has an active DHCP server (like your router).
Via GGM WATCH app :
We recommend creating or using a cloud account with the GGM WATACH app
Step 1: Add the device
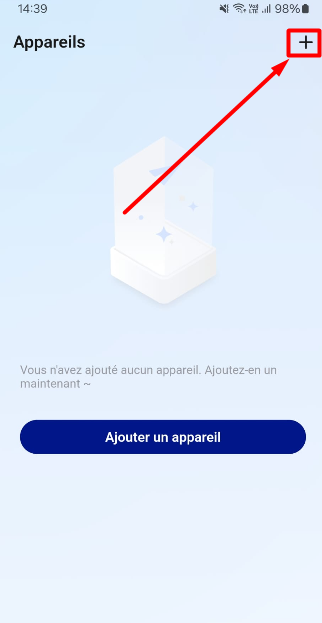
Click on the small + in the top right corner and then choose: Online device
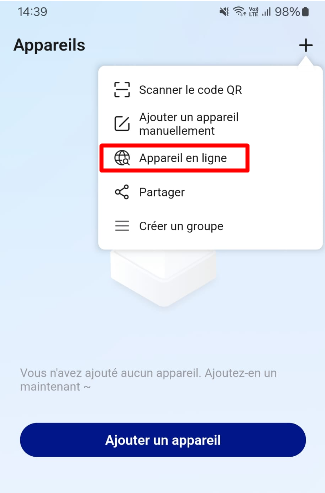
The app will scan GIGAMEDIA equipment on your local network.
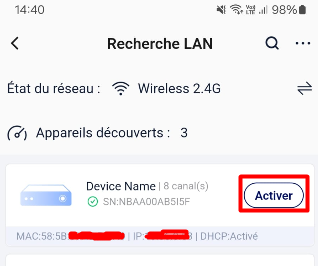
Step 2: Add your device
Select your device (identifiable by its MAC address) and ACTIVATE your device.
Step 3: Create the administrator password
There is no default password, you need to create a password and confirm it.
Your password will have to be "complex"
After validation, the device can restart automatically, wait until the next step.
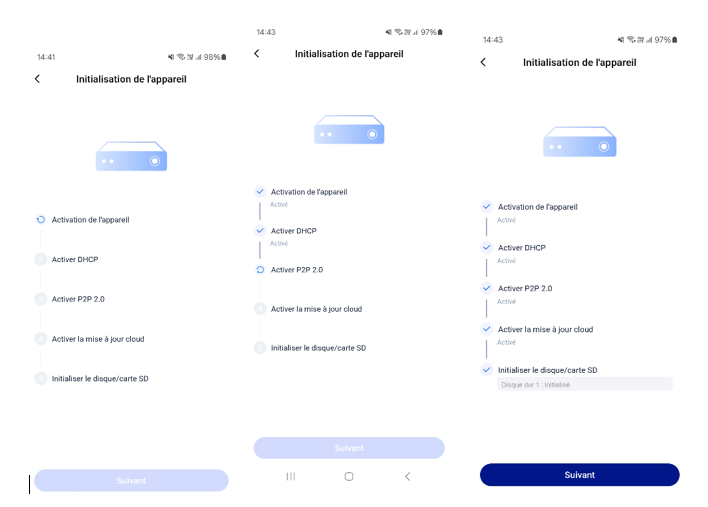
Step 4: Device Initialization
The device automatically does the following:
- Device activation
- DHCP activation (obtaining an IP address specific to your network)
- P2P activation (related to remote access)
- Cloud Update Activation (Automatic Update)
- Disk/SD Card Initialization (if you are using a storage disk for your recording
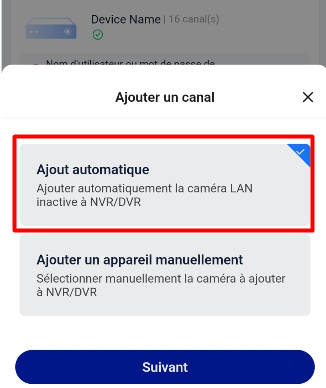
Step 5: Adding the cameras
If your cameras are plugged directly into the back of your recorder, on the dedicated POE ports, then you can choose AUTOMATIC ADDING
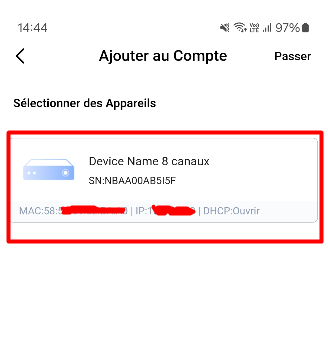
Step 6: Adding your device to your Cloud account
Select the device you want to add, otherwise skip this step
YOUR SYSTEM IS NOW READY TO USE
* Valid for the references below :
- GGM NVA321604MR
- GGM NVA320002MR
- GGM NVA320004MR
- GGM NVA160002R
- GGM NVA161602R
- GGM NVP2560016MR
- GGM NVP1280016MR
- GGM NVP640016MR
- GGM NVS160001D
- GGM NVS080801D
- GGM NVS040401D
- GGM NVI080801D
- GGM NVI040401D
- GGM IPAD4F2IR
- GGM IPAD6F2IR
- GGM IPAD8F2IR
- GGM IPAD4VM2IR
- GGM IPAD6VM2IR
- GGM IPAD8VM2IR
- GGM IPAT4F2IR
- GGM IPAT6F2IR
- GGM IPAT8F2IR
- GGM IPAT4VM2IR
- GGM IPAT6VM2IR
- GGM IPAT8VM2IR
- GGM IPAB4F2IR
- GGM IPAB4VM2IR
- GGM IPAB6F2IR
- GGM IPAB8F2IR
- GGM IPAB4VM5IR
- GGM IPAB6VM2IR
- GGM IPAB8VM2IR
- GGM IPAS5432IR300
- GGM IPPTT5AAA
- GGM IPPTT5ABB
- GGM IPPF121IR
- GGM IPPA4F2IR
- GGM IPPBP8F2DL
- GGM IPPTP8F2DL
- GGM IPPBT5AAA
- GGM IPPBT5ABB
- GGM IPPBL4VM2IR
- GGM IPPBL4VM8IR
- GGM IPPBT4BBC
- GGM IPPBT4BDD
- GGM IPPBT4BDE
- GGM IPPS7837IR300
- GGM IPSD4F2DL
- GGM IPSD6F2DL
- GGM IPSD8F2DL
- GGM IPSD4VM2IR
- GGM IPSD8VM2IR
- GGM IPST4F2DL
- GGM IPST6F2DL
- GGM IPST8F2DL
- GGM IPST4VM2DL
- GGM IPST6VM2DL
- GGM IPST8VM2DL
- GGM IPSC6F2IR
- GGM IPSB4F2DL
- GGM IPSB6F2DL
- GGM IPSB8F2DL
- GGM IPSB4VM2DL
- GGM IPSB6VM2DL
- GGM IPSB8VM2DL
- GGM IPSP143IR30
- GGM IPSS344DL50
- GGM IPSS4225IR300
- GGM IPSS4425IR160
- GGM IPIT8F2DL
- GGM IPIT2F2DL
- GGM IPIT4F2DL
- GGM IPIT4VM2DL
- GGM IPIB8F2DL
- GGM IPIB2F2DL
- GGM IPIB4F2DL
- GGM IPIB4VM2DL
Was this article helpful?
That’s Great!
Thank you for your feedback
Sorry! We couldn't be helpful
Thank you for your feedback
Feedback sent
We appreciate your effort and will try to fix the article